Within Snap Schedule, after adding an email address to an employee, you can email out employee schedules using the ‘Email Schedule Wizard’. This tutorial will walk you through each page of the wizard so that you will be able to send out emails to your employees.
To Start the Email Schedule Wizard – Click the ‘Email Schedules’ button located under the manage tab across the top (shown below).
On the first page, you will see your email sender information displayed (shown below).
Master Your Shift Scheduling
Snap Schedule 365 Automates It All!
Discover the power of automatic shift callouts, open shift notifications, time off & overtime management.

If you have not yet entered your email sender information – these tutorials demonstrate configuring Snap Schedule using 3rd party email services:
- How to email work schedules using your MSN/Hotmail account and Snap Schedule
- How to email work schedules using your Yahoo! account and Snap Schedule
- How to email work schedules using your Gmail account and Snap Schedule
When your email sender information is configured correctly, click the ‘Next’ button.
On page 2 of the wizard, the ‘Schedule’ page, you will choose which schedules will be sent out, and the time duration for the employees’ schedules you are sending. Each employee you check will have his schedule included in the outgoing emails – the schedule’s time range is specified with the drop down date range boxes.

When you have selected the schedules you are sending out and the time duration, click the ‘Next’ button.
On page 3 of the wizard, the ‘Recipients’ page, you will be selecting one of two options.
- The first option is to send out the schedules of the employees you selected to the employees individually – with or without an iCal attachment. In this option, each employee will receive his or her own schedule.
- The second option is to send out all of the schedule information, in a group, to each employee selected in the checkbox under the selection. The second option is used primarily for managers to see an entire team’s schedule at a glance.

When you are done making your selections, click the ‘Next’ button.
On page 4 of the wizard, the ‘Options’ page, you are given the option to add additional attachments to the emails you are sending out. Any attachment you could attach to a normal email can be sent out using Snap Schedule, and the size is only restricted by the email server that you are using to send out emails.

To attach a file, click the check box that is labeled ‘Add the following files as attachments in every email’. Once you have done this, you can click on ‘Browse…’ and locate the files you wish to attach. To remove a file from the attachment list, simply click on the file and click ‘Remove’ to delete the file.
When you have selected your attachments (if any) click the ‘Next’ button.
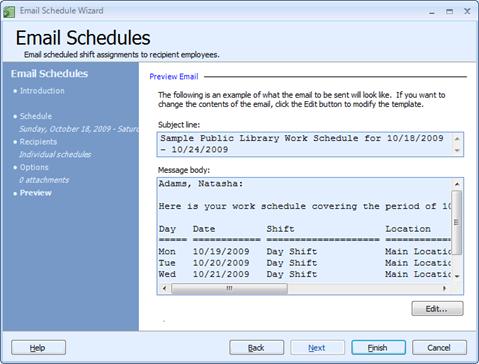
On page 5 of the wizard, the ‘Preview’ page, you will be shown an example of a schedule email that will be sent out using the current template – an example employee is taken at random.
To change the template that the wizard is using, click the ‘Edit…’ button. This will bring up a window that displays the template the wizard is currently using, and allows you to change the template to fit your needs.
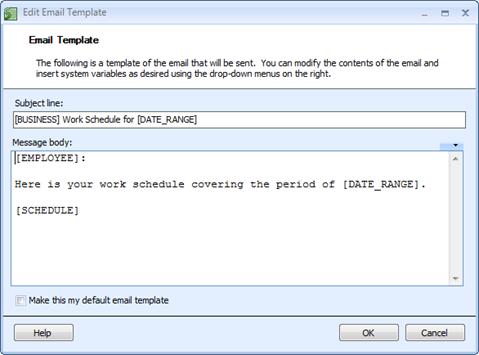
Snap Schedule recognizes the following place holders which are always enclosed in square brackets.
| [BUSINESS] | The business name defined in the ‘Business Information Settings’ screen |
| [DATE_RANGE] | The schedule start and end dates selected in the previous step. |
| [EMPLOYEE] | The full name of the employee in the form of last name, first name. |
| [EMPLOYEE_FIRST] | The employee’s first name |
| [EMPLOYEE_LAST] | The employee’s last name |
| [SCHEDULE] | When expanded, this placeholder is replaced with a multi-column table containing a column header and the following data fields: day of the week, date, employee name, shift description, location description, start time, end time, on call, and assignment reason. |
| [SHORT_SCHEDULE] | A shorter version of the employee’s personal schedule or the schedule of the group of selected employees depending on the option selected in the previous step. When expanded, the placeholder is replaced with a multi-column table containing the following data fields: date, employee name, shift description, location description, start time, and on call. |
| [MINI_SCHEDULE] | A compact version of the employee’s personal schedule or the schedule of the group of selected employees depending on the option selected in the previous step. When expanded, the placeholder is replaced with a multi-column table containing the following data fields: date, employee code, shift code, location code, and start time. |
| [MICRO_SCHEDULE] | An ultra compact version of the employee’s personal schedule or the schedule of the group of selected employees depending on the option selected in the previous step. When expanded, the placeholder is replaced with a multi-column table containing the following data fields: date, employee code, start time, and end time. |
| [SCHEDULE_NOTES] | An expanded version of the [SCHEDULE] place holder that also includes the shift assignment notes for each shift assignment. |
| [SCHEDULE_TASKS] | An expanded version of the [SCHEDULE] place holder that also lists the tasks scheduled in each shift. |
| [SCHEDULE_NOTES_TASKS] | An expanded version of the [SCHEDULE] place holder that also lists the tasks scheduled in each shift and the corresponding shift assignment notes. |
You can choose to save the template for future use by checking the box next to ‘Make this my default email template’. Once you are satisfied with the template, click the ‘OK’ button, which will return you to the ‘Preview’ page displaying a new example of the email, if the template was changed.
Clicking ‘Finish’ will prompt you to send the emails out, and then clicking ‘OK’ on the dialog box will begin the send operation.